
Choose your fabric. I started with from left to right: Navy Blue Chenille, 2 yards, a natural cotton batting (for the quilt stuffing) packaged in the baby quilt size, the fabulous sock monkey flannel 2 yards (and with my continuing affinity for sock monkeys and all monkeys in general...is this a surprise?) (Seriously...is it?) where was I? Oh yeah...white chenille an eighth of a yard, tan chenille, a quarter yard, and a left over red scrap of felt from the Christmas stockings. Pre-wash all the fabric so it is shrunk as much as it needs to before you continue on. All the material is cotton, except for the batting which is a cotton mix...although high on the cotton count. The chenille is a little sheddish...and will blow in the wind across your home! I hemmed up the raw edges before I put it in the washer and dryer.
 Step two:
I then drew out a pattern for a sock monkey to applique onto the navy chenille on a piece of paper, copying my favorite monkey from the flannel pattern. Yes, he has only one leg and one arm...I thought it was redundant to draw two of them...Then cut the body, legs, arms and head out of the tan chenille. Cut the feet and hands nose out of the white chenille
 . Cut the mouth, and leg and arm details out of the red felt. Remember: leave eenough material for a seam allowance for when you turn the raw edges under to applique onto the navy chenille.
It was at this point, I was horrified by the amount of chenille that my floor and myself were covered with...it looked like a strange murder scene...as you can see...the monkey was laid out like a police investigation...chenille evidence everywhere!
Step three:

sew the legs and arms feet and hands and red flannel leg and arm details to each other. I positioned the head and nose and mouth together and eyeballed where I really wanted to position them...and sewed the top of the white nose piece to the head and the bottom of the white nose piece to the body, so that at this point my monkey was all one piece, and much easier to handle.
 Step Four: I got into my delicious button tin at this point, which distracted me for more time than one would think! I love button tins...my mom has a wonderful one...I have such fond memories of playing in it as a child...all the smells and shapes and textures! I'm hoping to inherit it (hint hint)...even though I was accused of going through it and "stealing" buttons recently! (which I have never done) OK...choose good "eye" buttons, I picked out 2 vintage black deco 2 hole buttons and stitched them on the face. Then, center the monkey where you want him or her...turn under all the raw chenille edges and pin it to the navy chenille. Baste the monkey onto the chenille to hold it in place while you applique the monkey to the chenille, and take out the pins. I used a dark green thread to baste so I could easily pull it out after the applique process. If you are lucky like me, you will have a wonderful feline seamstress to help you out during the entire process! Then use a whip stitch to applique the monkey to the chenille fabric...I loved working with the chenille...even though it was so messy, because it was really forgiving and you could hardly see any of my stitches...I used different colored thread to applique depending on which part of the monkey I was working on at the time. I left a small hole on one side of the nose because I thought it would be cute to stuff it so it was more 3D! So, I hand sewed around the entire nose (except for the hole I left for stuffing) attatching it to the blue chenille...and stuffed the nose...and appliqued the rest of the nose to the chenille. This guy is a lot larger than I thought he would be...but, if I had made him smaller...I think he may have been lost in the sea of chenille.
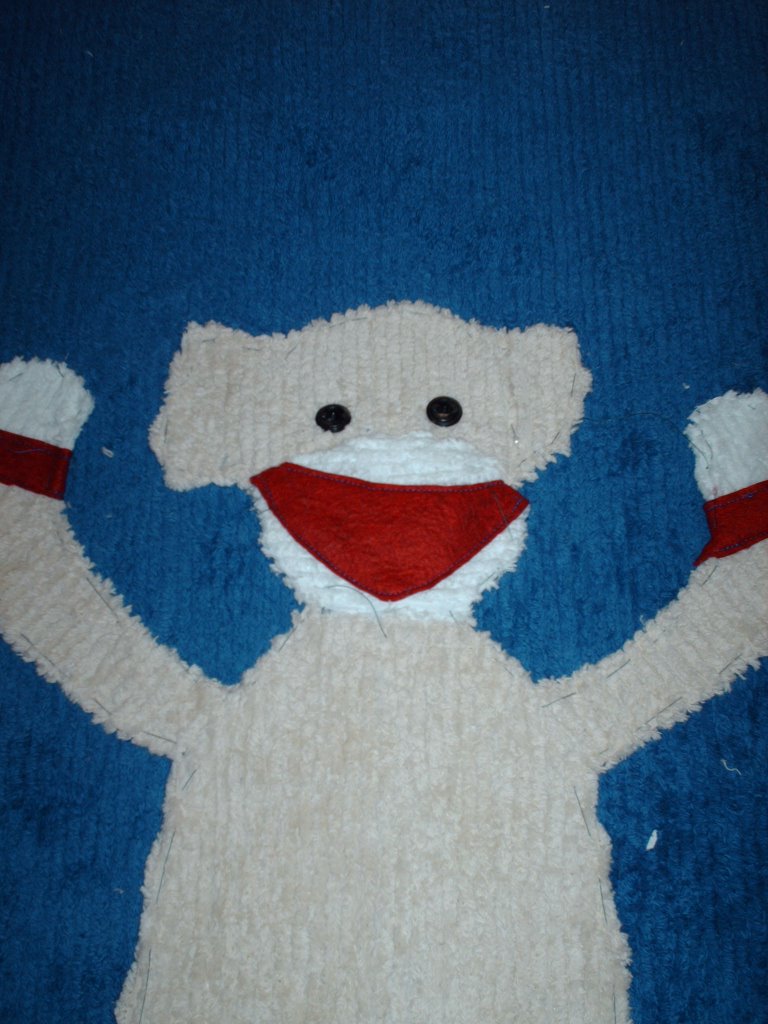 Step Five: I pinned under the hems on all the sides of the quilt, right side to right side. I then located where I thought this monkey may have a belly button (because monkeys with belly buttons are too cute!) and I threaded a really heavy duty needle with a true red yarn and pushed it through the flannel side up to where the belly button would be on the chenille side and tied a French knot in that space and then brought the thread back through to the flannel side and used the two pieces to tie a knot...this is called hand-tying. I then used about a million pins and as many man hours measuring out in 4 inch increments where I would repeat the same process (only about a hundred times...hahaha) until I had hand tied the entire piece together. So, there are red knots on the chenille side...and little tied knots on the flannel side! Then, when you are finished with that, you should have the entire thing pretty square...or rectangular...and you can then stitch the edges together and you are done! To wash this later, just wash in gentle cold and air fluff dry or dry outside!
 And there you have it! This took me approximately 2 Creative Sunday sessions...about 4 hours, and a couple of extra hours to applique the monkey on...but that was a lovely excuse to not get out of my PJ's until noon on one of my days off...so, it was well worth it! This is such a fun and fluffy blanket...all soft and cuddly too...Every once in a while, I'm worried that the monkey is a little too maniacal, but it really makes me smile! Diego loves to lay on it any chance he can get! Then again, he helped me so much to make it...
doesn't he deserve it?

1 comment:
I love the monkey quilt - apparently Diego does too!!
I used to play with my mom's button tins too. She had two of them full of the coolest looking buttons - I think they had been her mom's! Endless hours of entertainment! :)
Post a Comment